
![]()
This post is a short memo as regards the usage of GnuPG aka Gnu Privacy Guard aka GPG for short.
| Date | Version | Author | Comment |
|---|---|---|---|
| 2015-10-02 | 1.0 | SV | Initial version |
| 2017-03-14 | 2.0 | SV | Updated version covering key migration |
Table of Content
- Installation / Setup
- Migrating / Creating a New Key
- Generating the Primary Key
- Generating separate subkeys for signing and encryption
- Create a revocation certificate for the NEW key
- Backing Up Public, Secret Keys and ownertrust
- Export your public key
- [optional] Transition file
- Set default to the new key
- Expiring and/or Revoking The Old Key
- Removing the Primary Key / Prepare Laptop Key
- In Case of Emergency / Primary Key operations
- Key checks
- Keybase.io
- GPG CLI Usage
- GPG Keychain / Keyring
- Using GPG within git
- Advanced Tips and GPG-related tools
GnuPG is an implementation of the OpenPGP standard also known as RFC4880.
It defined an hybrid encryption framework based on the notion of Web of Trust to offer basically Mail | Document | Git commit... encryption / signature.
- Tutorial
- GPG Keypairs
- OpenPGP Best Practices
- GnuPG: implementation of the OpenPGP standard aka RFC4880
- Hybrid encryption framework based on Web of Trust
-
Mail | Document | Git commit...encryption / signature

Installation / Setup
Apart from the below (preferred) solutions per OS, a cross-platform approach relies on Thunderbird and the Enigmail extension.
Linux/BSD
- Install the
gnupgpackage. - You might also consider GPGME – GnuPG Made Easy – tutorial
Mac OS X
- Install the GPGTools Suite
- GPG for Apple Mail and GPG Keychain
- GPG Services and MacGPG


Windows
Gpg4win (GNU Privacy Guard for Windows) is the reference package implementation to use GPG under windows – tutorial
It includes the following programs:
- GnuPG, which forms the heart of Gpg4win - the actual encryption software.
- Kleopatra, the central certificate administration of Gpg4win, which ensures uniform user navigation for all cryptographic operations.
- GNU Privacy Assistant (GPA), an alternative program for managing certificates, in addition to Kleopatra.
- GnuPG for Outlook (GpgOL), an extension for Microsoft Outlook 2003 and 2007, which is used to sign and encrypt messages.
- GPG Explorer eXtension (GpgEX), an extension for Windows Explorer which can be used to sign and encrypt files using the context menu.
- Claws Mail, a full e-mail program that offers very good support for GnuPG.
Migrating / Creating a New Key
Pre-requisites
$> brew install hopenpgp-tools
Download the gpg.conf as part of duraconf - A collection of hardened configuration files for SSL/TLS services which implement the Riseup OpenPGP Best Practices
$> wget https://raw.githubusercontent.com/ioerror/duraconf/master/configs/gnupg/gpg.conf
General recommendations / Best practices
- create a 4096bit RSA key, with the sha512 hashing algorithm
- Use the concept of GPG key subpairs
- your primary key is only meant for certification / authentication purposes (in particular not for signing or encrypting). Use the
--expertflag upon generation to configure it that way
- your primary key is only meant for certification / authentication purposes (in particular not for signing or encrypting). Use the
- Expiration date should be within less than two years.
- You can always extend the key expiration as long as you still have access to the key, even after it has expired
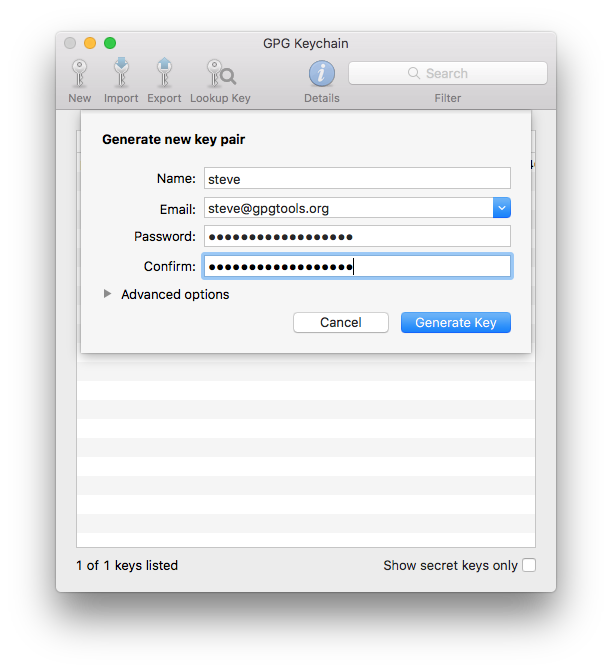
Generating the Primary Key
Invoke gpg --gen-key with the --expert flag to expose some additional menu items.
Select RSA key with
# Generate the new primary key for authentication / certification only
$> gpg --gen-key --expert
gpg (GnuPG/MacGPG2) 2.0.30; Copyright (C) 2015 Free Software Foundation, Inc.
This is free software: you are free to change and redistribute it.
There is NO WARRANTY, to the extent permitted by law.

Please select what kind of key you want:
   (1) RSA and RSA (default)
   (2) DSA and Elgamal
   (3) DSA (sign only)
   (4) RSA (sign only)
   (7) DSA (set your own capabilities)
   (8) RSA (set your own capabilities)
Your selection? 8
Make it capable only of certifying / authenticate other keys
Possible actions for a RSA key: Sign Certify Encrypt Authenticate
Current allowed actions: Sign Certify Encrypt

   (S) Toggle the sign capability
   (E) Toggle the encrypt capability
   (A) Toggle the authenticate capability
   (Q) Finished

Your selection? s

Possible actions for a RSA key: Sign Certify Encrypt Authenticate
Current allowed actions: Certify Encrypt

   (S) Toggle the sign capability
   (E) Toggle the encrypt capability
   (A) Toggle the authenticate capability
   (Q) Finished

Your selection? e

Possible actions for a RSA key: Sign Certify Encrypt Authenticate
Current allowed actions: Certify

   (S) Toggle the sign capability
   (E) Toggle the encrypt capability
   (A) Toggle the authenticate capability
   (Q) Finished

Your selection? q
Select a 4096 bits key
RSA keys may be between 1024 and 4096 bits long.
What keysize do you want? (2048) 4096
Requested keysize is 4096 bits
Set an expiration date of 2 years – You can always extend the key expiration as long as you still have access to the key, even after it has expired. Why should I set an expiration.
Make sure to add an entry to set a calendar event to remind you about your expiration date
Please specify how long the key should be valid.
         0 = key does not expire
      <n>  = key expires in n days
      <n>w = key expires in n weeks
      <n>m = key expires in n months
      <n>y = key expires in n years
Key is valid for? (0) 2y
Key expires at Fri Mar  1 10:14:44 2019 CET
Is this correct? (y/N) y
Set the UID (name / email) WITHOUT comment, and make sure to use a very very strong passphrase (use your favorite password manager for that like 1Password):
GnuPG needs to construct a user ID to identify your key.

Real name: Sebastien Varrette
Email address: Sebastien.Varrette@uni.lu
Comment: Primary Certification Key
You selected this USER-ID:
    "Sebastien Varrette <Sebastien.Varrette@uni.lu>"

Change (N)ame, (C)omment, (E)mail or (O)kay/(Q)uit? O
You need a Passphrase to protect your secret key.

We need to generate a lot of random bytes. It is a good idea to perform
some other action (type on the keyboard, move the mouse, utilize the
disks) during the prime generation; this gives the random number
generator a better chance to gain enough entropy.
gpg: key 4F156AD7 marked as ultimately trusted
public and secret key created and signed.

gpg: checking the trustdb
gpg: Note: signatures using the MD5 algorithm are rejected
gpg: 3 marginal(s) needed, 1 complete(s) needed, PGP trust model
gpg: depth: 0  valid:   3  signed:  21  trust: 0-, 0q, 0n, 0m, 0f, 3u
gpg: depth: 1  valid:  21  signed:   5  trust: 11-, 0q, 0n, 3m, 7f, 0u
gpg: depth: 2  valid:   2  signed:   0  trust: 2-, 0q, 0n, 0m, 0f, 0u
gpg: next trustdb check due at 2017-03-08
pub   4096R/4F156AD7 2017-03-01 [expires: 2019-03-01]
      Key fingerprint = 1A53 FD6E 09A4 4DBA 7A9F  D72B 5D08 BCDD 4F15 6AD7
uid       [ultimate] Sebastien Varrette <Sebastien.Varrette@uni.lu>
At this point, we have a new OpenPGP (4096-bit RSA) primary key for Certifying other keys (with ID 4F156AD7 in the above case), together (eventually) with your old key (ID DD01D5C0 in my case) – use gpg -K to list them.
$> gpg -K
sec   1024D/DD01D5C0 2006-05-19
uid                  Sebastien Varrette (Falkor) <Sebastien.Varrette@imag.fr>
uid                  Sebastien Varrette <Sebastien.Varrette@uni.lu>
ssb   2048g/9BE4EF49 2006-05-19

sec   4096R/4F156AD7 2017-03-01 [expires: 2019-03-01]
uid                  Sebastien Varrette <Sebastien.Varrette@uni.lu>
You probably wish to set a primary UID for this key (assuming you defined many of them)
$> gpg --edit-key 0x4F156AD7
[...]
Secret key is available.

pub  4096R/4F156AD7  created: 2017-03-01  expires: 2019-03-01  usage: C
                     trust: ultimate      validity: ultimate
[ultimate] (1). Sebastien Varrette <Sebastien.Varrette@uni.lu>
[ultimate] (2)  Sebastien Varrette (Falkor) <Sebastien.Varrette@gmail.com>

# Select the default UID (from its number)
gpg> uid 1

pub  4096R/4F156AD7  created: 2017-03-01  expires: 2019-03-01  usage: C
                     trust: ultimate      validity: ultimate
[ultimate] (1)* Sebastien Varrette <Sebastien.Varrette@uni.lu>
[ultimate] (2)  Sebastien Varrette (Falkor) <Sebastien.Varrette@gmail.com>

# Make it primary
gpg> primary
[...]
gpg> save            # Commit your changes
Add other elligible UIDs and a photo
You probably want to complete it with additional UID (other elligible email(s)) and photos.
$> gpg --edit-key 0x4F156AD7
[...]
gpg> adduid          # Add a new UID
Real name: Sebastien Varrette
Email address: Sebastien.Varrette@gmail.com
Comment: Falkor
You selected this USER-ID:
    "Sebastien Varrette (Falkor) <Sebastien.Varrette@gmail.com>"
[...]
gpg> save            # Commit your changes
Prepare one (small) picture of you, keeping the image close to 240x288 and as small as possible.
$> gpg --edit-key 0x4F156AD7
[...]
gpg> addphoto       # Add a picture to your key

Pick an image to use for your photo ID.  The image must be a JPEG file.
Remember that the image is stored within your public key.  If you use a
very large picture, your key will become very large as well!
Keeping the image close to 240x288 is a good size to use.

Enter JPEG filename for photo ID: /Users/svarrette/Desktop/svarrette.jpg
Are you sure you want to use it? (y/N) y
Is this photo correct (y/N/q)? y

# Commit your changes
gpg> save
Ensure that the new key uses strong cryptography preferences.
By default, the encryption preferences specified in your public key are probably not as strong as they should be.
Thus you should set stronger default security preferences (to use SHA512, AES256 and ZLIB by default) using the setpref command, i.e.:
setpref SHA512 SHA384 SHA256 SHA224 AES256 AES192 AES CAST5 ZLIB BZIP2 ZIP Uncompressed
In practice:
$> gpg --edit-key 0x4F156AD7
[...]
gpg> showpref        # Show current Preferences
[ultimate] (1). Sebastien Varrette (Falkor) <Sebastien.Varrette@gmail.com>
     Cipher: AES256, AES192, AES, CAST5, 3DES, IDEA
     Digest: SHA256, SHA1, SHA384, SHA512, SHA224
     Compression: ZLIB, BZIP2, ZIP, Uncompressed
     Features: MDC, Keyserver no-modify
[ultimate] (2)  Sebastien Varrette <Sebastien.Varrette@uni.lu>
     Cipher: AES256, AES192, AES, CAST5, 3DES, IDEA
     Digest: SHA256, SHA1, SHA384, SHA512, SHA224
     Compression: ZLIB, BZIP2, ZIP, Uncompressed
     Features: MDC, Keyserver no-modify

# Set better defaults security preferences
gpg> setpref SHA512 SHA384 SHA256 SHA224 AES256 AES192 AES CAST5 ZLIB BZIP2 ZIP Uncompressed
[...]

# Check the result
gpg> showpref
[ultimate] (1)  Sebastien Varrette (Falkor) <Sebastien.Varrette@gmail.com>
     Cipher: AES256, AES192, AES, CAST5, 3DES
     Digest: SHA512, SHA384, SHA256, SHA224, SHA1
     Compression: ZLIB, BZIP2, ZIP, Uncompressed
     Features: MDC, Keyserver no-modify
[ultimate] (2). Sebastien Varrette <Sebastien.Varrette@uni.lu>
     Cipher: AES256, AES192, AES, CAST5, 3DES
     Digest: SHA512, SHA384, SHA256, SHA224, SHA1
     Compression: ZLIB, BZIP2, ZIP, Uncompressed
     Features: MDC, Keyserver no-modify
# Commit your changes
gpg> save
Generating separate subkeys for signing and encryption
The primary key created above is used only for certifications (i.e. signing another key), which happen infrequently. In your daily GPG usage, you need in addition subkeys for signing (e.g. signing an email message or files), encrypting (mails or files) or authenticating. It is useful to separate those purposes as one is way more important than the other.
To add a subkey (for a given purpose), the command to use when interactively editing a key is addkey (to sign only, or to encrypt only).
Select a 4096 bites size, put an expiration date of no more than 18 months for these subkeys.
Use again the --expert flag to specify the charactistics of the key the way you want.
$> gpg --expert --edit-key 0x4F156AD7
[...]
gpg> addkey
[...]
Please select what kind of key you want:
   (3) DSA (sign only)
   (4) RSA (sign only)
   (5) Elgamal (encrypt only)
   (6) RSA (encrypt only)
   (7) DSA (set your own capabilities)
   (8) RSA (set your own capabilities)
Your selection? 8
[...]
Current allowed actions: Sign Encrypt

   (S) Toggle the sign capability
   (E) Toggle the encrypt capability
   (A) Toggle the authenticate capability
   (Q) Finished

Your selection? e
Current allowed actions: Sign
[...]
Your selection? q
[...]
What keysize do you want? (2048) 4096
[...]
Key is valid for? (0) 18m
Key expires at Thu Aug 23 16:45:07 2018 CEST
Is this correct? (y/N) y
Really create? (y/N) y
[...]
gpg> save
At the end, you should see two subkeys as follows (notice the usage of each subkeys sub):
$> gpg --expert --edit-key 0x4F156AD7
[...]
pub  4096R/4F156AD7  created: 2017-03-01  expires: 2019-03-01  usage: C
                     trust: ultimate      validity: ultimate
sub  4096R/162C95D4  created: 2017-03-01  expires: 2018-08-23  usage: S
sub  4096R/354B109D  created: 2017-03-01  expires: 2018-08-23  usage: E
sub  4096R/180E98A5  created: 2017-03-01  expires: 2018-08-23  usage: A
[ultimate] (1). Sebastien Varrette <Sebastien.Varrette@uni.lu>
[ultimate] (2)  Sebastien Varrette (Falkor) <Sebastien.Varrette@gmail.com>
[ultimate] (3)  [jpeg image of size 3075]
Create a revocation certificate for the NEW key
If you forget your passphrase or if your [master] private key is compromised or lost, the only hope you have is to wait for the key to expire (this is not a good solution), or to activate your revocation certificate by publishing it to the keyservers. Doing this will notify others that this key has been revoked.
Good point is that a revoked key can still be used to verify old signatures, or decrypt data (if you still have access to the private key), but it cannot be used to encrypt new messages to you.
/!\ WARNING: This is important, don’t skip this step!
A revocation certificates comes with a reason, so when a new key pair is created, generic revocation certificates for that key pair should be generated and securely stored. It is recommended that a certificate is generated for each appropriate revocation reason type:
- No reason specified
- Key has been compromised (your normally need to set a description message)
- Key is no longer used
Note: the reason “Key is superseded” is not appropriate for a new key since it is not possible to know which key will replace it.
Again, generic revocation certificates need to be stored safe but securely until needed.
You need to operate and save these files in an encrypted vault (Use Knox / encrypted sparsebundle / encFS / encrypted USB drive / CipherShed / whatever)
$> cd /path/to/encrypted/vault
$> mkdir gpg && cd gpg
$> gpg --output revoke-4F156AD7-no-reason.asc      --armor --gen-revoke 4F156AD7
$> gpg --output revoke-4F156AD7-compromised.asc    --armor --gen-revoke 4F156AD7
$> gpg --output revoke-4F156AD7-no-longer-used.asc --armor --gen-revoke 4F156AD7
Example of output:
$> gpg --output revoke-4F156AD7-no-reason.asc --armor --gen-revoke 4F156AD7
sec  4096R/4F156AD7 2017-03-01 Sebastien Varrette <Sebastien.Varrette@uni.lu>

Create a revocation certificate for this key? (y/N) y
Please select the reason for the revocation:
  0 = No reason specified
  1 = Key has been compromised
  2 = Key is superseded
  3 = Key is no longer used
  Q = Cancel
(Probably you want to select 1 here)
Your decision? 0
Enter an optional description; end it with an empty line:
>
Reason for revocation: No reason specified
(No description given)
Is this okay? (y/N) y

You need a passphrase to unlock the secret key for
user: "Sebastien Varrette <Sebastien.Varrette@uni.lu>"
4096-bit RSA key, ID 4F156AD7, created 2017-03-01

Revocation certificate created.

Please move it to a medium which you can hide away; if Mallory gets
access to this certificate he can use it to make your key unusable.
It is smart to print this certificate and store it away, just in case
your media become unreadable.  But have some caution:  The print system of
your machine might store the data and make it available to others!
Backing Up Public, Secret Keys and ownertrust
$> cd /path/to/encrypted/vault/gpg
$> gpg -a --export 4F156AD7 > gpg-4F156AD7.key.pub          # Export public key
$> gpg -a --export-secret-keys 4F156AD7 > gpg-4F156AD7.key  # Export private key
$> gpg --export-ownertrust > gpg-4F156AD7-ownertrust.txt    # Export ownertrust
Note: later on, if you need to import the secret key (which contains the public key) and ownertrust, use:
$> gpg --import gpg-4F156AD7.key
$> gpg --import-ownertrust gpg-4F156AD7-ownertrust.txt
Export your public key
$> cd ~/.ssh
$> mkdir gpg && gpg
$> gpg -a --export 4F156AD7 > 4F156AD7-sebastien.varrette@uni.lu.asc
Web Of Trust: cross-sign the new key with the old key
Since we’ve generated an entirely new key, we need to form a trust link between the old and new keys by cross-signing. If people have your old key, this helps them trust that the new key was generated by you.
$> gpg --default-key <old_key> --sign-key <new_key>  # Sign the new key with the old one
$> gpg --default-key <new_key> --sign-key <old_key>  # Sign the old key with the new one
In practice:
# <new_key> = 4F156AD7   <old_key> = DD01D5C0
$> gpg --default-key  DD01D5C0 --sign-key 4F156AD7
$> gpg --default-key  4F156AD7 --sign-key  DD01D5C0
Use the sks keyserver pool with secure connections as default keyserver
Quoting riseup tutorial:
Most OpenPGP clients come configured with a single, specific keyserver. This is not ideal because if the keyserver fails, or even worse, if it appears to work but is not functioning properly, you may not receive critical key updates. Not only is this a single point of failure, it is also a prime source of leaks of relationship information between OpenPGP users, and thus an attack target. Therefore, we recommend using the sks keyservers pool. The machines in this pool have regular health checks to ensure that they are functioning properly. If a server is not working well, it will be removed automatically from the pool.
$> mkdir ~/.gnupg/certs
$> cd ~/.gnupg/certs
$> wget https://sks-keyservers.net/sks-keyservers.netCA.pem
$> wget https://sks-keyservers.net/sks-keyservers.netCA.pem.asc
Then update ~/.gnupg/gpg.conf as follows:
#-----------------------------
# keyserver
#-----------------------------

# This is the server that --recv-keys, --send-keys, and --search-keys will
# communicate with to receive keys from, send keys to, and search for keys on
keyserver hkps://hkps.pool.sks-keyservers.net

# Provide a certificate store to override the system default
# Get this from https://sks-keyservers.net/sks-keyservers.netCA.pem
# :keyserver-options ca-cert-file=/usr/local/etc/ssl/certs/hkps.pool.sks-keyservers.net.pem
keyserver-options ca-cert-file=~/.gnupg/certs/sks-keyservers.netCA.pem
Note the complete file is available on Github.
Export and Uploading your new and old keys to key server
Export your public key(s)
$> mkdir ~/.ssh/gpg
$> cd  ~/.ssh/gpg
$> gpg -a --export 4F156AD7 > 4F156AD7-sebastien.varrette@uni.lu.asc
Upload your new and old keys to the [sks / MIT] key servers:
$> gpg --send-keys A403AC45DD01D5C0 5D08BCDD4F156AD7
$> gpg --keyserver pgp.mit.edu --send-keys A403AC45DD01D5C0 5D08BCDD4F156AD7
[optional] Transition file
You might wish also to create a transition statement file signed with both keys. Sample migration document.
$> vim transition-statement.md
# Embed signature using the OLD key
$> gpg --digest-algo SHA512 --default-key A403AC45DD01D5C0 --clearsign transition-statement.md
$> mv transition-statement.md.asc DD01D5C0-transition-statement.md.asc
# Embed signature using the NEW key
$> gpg --clearsign transition-statement.md
$> mv transition-statement.md.asc  4F156AD7-transition-statement.md.asc
The created signed files are available on Github.
Set default to the new key
The default key on the keyring needs to be changed from the old key to the new. This will ensure that all future signatures will use by default the new key.
To make the new key the default, set the default-key in the ~/.gnupg/gpg.conf configuration file.
Expiring and/or Revoking The Old Key
We need to tell the world to not use the old key anymore. There are two ways to do this:
- Wait for the expiration date to be reached. It tells the world not to use the key anymore but that you still control the secret parts.
- Revoke the (old) key. This tells the world to not trust the key anymore.
Just as we created (in advance) revocation certificates for the new key, you shall create a revocation certificate for your old key with reason “Key is superseded” – place as comment “Superseded by 0x<NEW KEY ID>”
$> gpg --output revoke-DD01D5C0-superseed-by-4F156AD7.asc --armor --gen-revoke DD01D5C0
sec  1024D/0xA403AC45DD01D5C0 2006-05-19 Sebastien Varrette (Falkor) <Sebastien.Varrette@imag.fr>

Create a revocation certificate for this key? (y/N) y
Please select the reason for the revocation:
  0 = No reason specified
  1 = Key has been compromised
  2 = Key is superseded
  3 = Key is no longer used
  Q = Cancel
(Probably you want to select 1 here)
Your decision? 2
Enter an optional description; end it with an empty line:
> Superseded by 0x5D08BCDD4F156AD7
>
Reason for revocation: Key is superseded
Superseded by 0x5D08BCDD4F156AD7
Is this okay? (y/N) y
Now, import the revocation certificate and send it to the public key server(s):
$> gpg --import revoke-DD01D5C0-superseed-by-4F156AD7.asc
$> gpg --send-keys A403AC45DD01D5C0
$> gpg --keyserver pgp.mit.edu  --send-keys A403AC45DD01D5C0
Removing the Primary Key / Prepare Laptop Key
we can separate the primary key (made for certification only) from the 3 subkeys and gain some security. This set is often refered to as “laptop keys”, as you can keep them on your laptop while the primary key secret remains safely locked away.
Unfortunately, the process for removing the primary key is non-obvious. So let’s go:
First backup everything:
$> cd /path/to/encrypted/vault/gpg
$> mkdir -p backup/.gnupg
$> cd backup
$> rsync -avzu ~/.gnupg/*.gpg .gnupg
note: Initial state:
$> gpg -k 4F156AD7     # Public part of the key
pub   4096R/0x5D08BCDD4F156AD7 2017-03-01 [expires: 2019-03-01]
      Key fingerprint = 1A53 FD6E 09A4 4DBA 7A9F  D72B 5D08 BCDD 4F15 6AD7
uid                 [ultimate] Sebastien Varrette <Sebastien.Varrette@uni.lu>
uid                 [ultimate] Sebastien Varrette (Falkor) <Sebastien.Varrette@gmail.com>
uid                 [ultimate] [jpeg image of size 3075]
sub   4096R/0x28E10E61162C95D4 2017-03-01 [expires: 2018-08-23]
sub   4096R/0xEE2047E4354B109D 2017-03-01 [expires: 2018-08-23]
sub   4096R/0x5BE73686180E98A5 2017-03-01 [expires: 2018-08-23]

$> gpg -K 4F156AD7     # Private part of the key
sec   4096R/0x5D08BCDD4F156AD7 2017-03-01 [expires: 2019-03-01]
      Key fingerprint = 1A53 FD6E 09A4 4DBA 7A9F  D72B 5D08 BCDD 4F15 6AD7
uid                            Sebastien Varrette <Sebastien.Varrette@uni.lu>
uid                            Sebastien Varrette (Falkor) <Sebastien.Varrette@gmail.com>
uid                            [jpeg image of size 3075]
ssb   4096R/0x28E10E61162C95D4 2017-03-01 [expires: 2018-08-23]
ssb   4096R/0xEE2047E4354B109D 2017-03-01 [expires: 2018-08-23]
ssb   4096R/0x5BE73686180E98A5 2017-03-01 [expires: 2018-08-23]
Export just the subkey secrets:
$> cd /path/to/encrypted/vault/gpg
$> mkdir subkeys && cd subkeys
$> gpg -a --export-secret-subkeys 4F156AD7 > gpg-4F156AD7_subkeys.key
Then delete the entire (both primary and subkeys) secret part of your key from the keyring:
$> gpg --delete-secret-keys 4F156AD7
sec  4096R/0x5D08BCDD4F156AD7 2017-03-01 Sebastien Varrette <Sebastien.Varrette@uni.lu>

Delete this key from the keyring? (y/N) y
This is a secret key! - really delete? (y/N) y
This leaves us with the public part in ~/.gnupg/pubring.gpg unchanged, but the private part empty
$> gpg -k 4F156AD7     # Public part of the key
pub   4096R/0x5D08BCDD4F156AD7 2017-03-01 [expires: 2019-03-01]
      Key fingerprint = 1A53 FD6E 09A4 4DBA 7A9F  D72B 5D08 BCDD 4F15 6AD7
uid                 [ultimate] Sebastien Varrette <Sebastien.Varrette@uni.lu>
uid                 [ultimate] Sebastien Varrette (Falkor) <Sebastien.Varrette@gmail.com>
uid                 [ultimate] [jpeg image of size 3075]
sub   4096R/0x28E10E61162C95D4 2017-03-01 [expires: 2018-08-23]
sub   4096R/0xEE2047E4354B109D 2017-03-01 [expires: 2018-08-23]
sub   4096R/0x5BE73686180E98A5 2017-03-01 [expires: 2018-08-23]

$> gpg -K 4F156AD7     # Private part
gpg: error reading key: No secret key
Now re-import just the subkeys previously exported (i.e. not the full secret key from earlier):
$> gpg --import gpg-4F156AD7_subkeys.key
gpg: key 0x5D08BCDD4F156AD7: secret key imported
gpg: key 0x5D08BCDD4F156AD7: "Sebastien Varrette <Sebastien.Varrette@uni.lu>" 2 new signatures
gpg: Total number processed: 1
gpg:         new signatures: 2
gpg:       secret keys read: 1
gpg:   secret keys imported: 1
You can check that everything is fine i.e. that you have now laptop keys:
$>gpg -K 4F156AD7
sec#  4096R/0x5D08BCDD4F156AD7 2017-03-01 [expires: 2019-03-01]
      Key fingerprint = 1A53 FD6E 09A4 4DBA 7A9F  D72B 5D08 BCDD 4F15 6AD7
uid                            Sebastien Varrette <Sebastien.Varrette@uni.lu>
uid                            Sebastien Varrette (Falkor) <Sebastien.Varrette@gmail.com>
uid                            [jpeg image of size 3075]
ssb   4096R/0x28E10E61162C95D4 2017-03-01 [expires: 2018-08-23]
ssb   4096R/0xEE2047E4354B109D 2017-03-01 [expires: 2018-08-23]
ssb   4096R/0x5BE73686180E98A5 2017-03-01 [expires: 2018-08-23]
Notice the # after sec: this denotes that the primary key secret is not in your keyring.
Change the passphrase protecting the subkeys – This way if your (new) subkey passphrase is compromised, the primary master key will remain safe.
$> gpg --edit-key 4F156AD7 passwd
In Case of Emergency / Primary Key operations
References:
To sign someone other keys or to create or revoke a SubKey, the Primary Master Secret Key is needed, for this reason it is suggested to use a temporary keyring, in a safe environment.
Importing the primary secret key into a temporary (secondary) keyring
To import from the safe storage medium / encrypted vault back to a temporary (secondary) keyring:
$> cd /path/to/encrypted/vault
# Assuming gpg-4F156AD7.key private primary key export is here
$> mkdir tmp-keyring
$> cd tmp-keyring
$> cp -r ~/.gnupg/certs .

# Import the secret key into a temporary keyring ./tmp-{ public | private }-kr.gpg
$> gpg --no-default-keyring \
       --keyring ./tmp-public-kr.gpg --secret-keyring ./tmp-private-kr.gpg --trustdb-name ./tmp-trustdb.gpg \
       --import ../gpg-4F156AD7.key
You might wish to create a wrapper for the secondary keyring, typically as follows:
#!/bin/bash
# /path/to/encrypted/vault/tmp-keyring/tmpgpg

gpg --no-default-keyring --keyring ./tmp-public-kr.gpg --secret-keyring ./tmp-private-kr.gpg --trustdb-name ./tmp-trustdb.gpg $@
Use Case 1: Sign someone else’s GPG Key
# Retrieve the key that needs to be signed
$> gpg --no-default-keyring \
       --keyring ./tmp-public-kr.gpg --secret-keyring ./tmp-private-kr.gpg --trustdb-name ./tmp-trustdb.gpg \
       --keyserver pgp.mit.edu --recv-keys <fingerprint>
# OR
$> ./tmpgpg --keyserver pgp.mit.edu --recv-keys <fingerprint>    # adpat fingerprint accordingly

# Check if the key has been correctly imported:
$> ./tmpgpg -k <fingerprint>

# Sign the Key
$> ./tmpgpg  --ask-cert-level --sign-key <fingerprint>

# Eventually update the trust on the key (You'll need to set an ultimate trust if you wish to send encrypted mails)
$> ./tmpgpg --edit-key <fingerprint>
[...]
gpg> trust
[...]
gpg> quit

# Check that it worked as expected
$> ./tmpgpg --list-sigs <fingerprint>

# Upload back the signed key to the keyserver
$> ./tmpgpg --keyserver pgp.mit.edu --send-key <fingerprint>   # send to pgp.lit.edu
$> ./tmpgpg --keyserver hkps://hkps.pool.sks-keyservers.net --keyserver-options ca-cert-file=./certs/sks-keyservers.netCA.pem --send-keys <fingerprint>
Once you have finished, DON’T FORGET THE PROLOGUE STEP BELOW
Example:
# === UL HPC Admin Group ===
# S. Varrette       C. Parisot        H. Cartiaux        V. Plugaru        S. Diehl
# 5D08BCDD4F156AD7  07FEA8BA69203C2D  37183CEF550DF40B   3F3242C5B34D98C2  6429C2514EBC4737
~
$> for id in  07FEA8BA69203C2D  37183cef550df40b   3F3242C5B34D98C2  6429C2514EBC4737; do \
      ./tmpgpg --keyserver pgp.mit.edu --recv-keys $id; \
      ./tmpgpg --sign-key --ask-cert-level $id; \
   done
$> ./tmpgpg -k | grep pub
./tmp-public-kr.gpg
pub   4096R/0x5D08BCDD4F156AD7 2017-03-01 [expires: 2019-03-01]
pub   4096R/0x07FEA8BA69203C2D 2017-03-09 [expires: 2019-03-09]
pub   4096R/0x37183CEF550DF40B 2011-08-01 [expires: 2021-07-29]
pub   4096R/0x3F3242C5B34D98C2 2017-03-09 [expires: 2019-03-09]
pub   4096R/0x6429C2514EBC4737 2017-01-06 [expires: 2027-01-01]

$> ./tmpgpg --list-sigs

# Send them
$> for id in  07FEA8BA69203C2D  37183cef550df40b   3F3242C5B34D98C2  6429C2514EBC4737; do \
      ./tmpgpg --keyserver pgp.mit.edu --send-key $id; \
       ./tmpgpg --keyserver hkps://hkps.pool.sks-keyservers.net --keyserver-options ca-cert-file=./certs/sks-keyservers.netCA.pem --send-keys  $id; \
   done
Use Case 2: Extending the lifetime of a key
The point of setting an expiration date for all of your keys is to have them actually expire if you lose access to the master keys or the revokation key. Besides, checking your keys at least once per year can is a good practice that probably enhances your security.
$> ./tmpgpg --edit-key <fingerprint>
gpg> expire
[...]
gpg> save
Prologue: securely delete the temporary (secondary) keyring
Once you have finished, if the temporary wallet is written in a non-volatile filesystem, it is mandatory to remove temporary files in the safest way from the media where all these operation are made.
For this reason, it is suggested to use shred (or srm on Mac OS X, to be installed with brew install srm) to overwrite the file multiple times using patterns chosen to maximize destruction of the residual data.
# Linux
$> shred -vfzu -n 10 ./tmp-*

# Mac OS X
$> brew install srm
$> brew link --force homebrew/dupes/srm
$> srm -v ./tmp-*
Now you can safely unmount your vault.
Key checks
According to RFC4880: “V3 keys are deprecated” so you have to make sure your keys are OpenPGPv4.
$> gpg --export-options export-minimal --export '4F156AD7' | gpg --list-packets |grep version
	version 4, algo 1, created 1488361903, expires 0
	version 4, created 1488379876, md5len 0, sigclass 0x13
	version 4, created 1488366555, md5len 0, sigclass 0x13
	version 4, created 1488374686, md5len 0, sigclass 0x13
	version 4, algo 1, created 1488378396, expires 0
	version 4, created 1488378396, md5len 0, sigclass 0x18
	version 4, algo 1, created 1488379557, expires 0
	version 4, created 1488379557, md5len 0, sigclass 0x18
	version 4, algo 1, created 1488381897, expires 0
	version 4, created 1488381897, md5len 0, sigclass 0x18
Etc.
Keybase.io
Keybase.io aims to make life with GPG easier. It does a really good job but it encourages a bad behavior in key management, i.e. by default, it creates and stores a private key on their server. We can never truly verify the condition of their server so a Keybase-hosted private key should always be considered untrustworthy. So we will configure Keybase.io to just use our existing key
Install keybase:
$> brew cask install keybase
You can then configure the completion files on your system:
- Bash completion file – see Issue #147 in the Keybase Bugtracker
- ZSH completion file – see Issue #519 in the Keybase Bugtracker
Now you can select your (local) gpg key and import the public key to Keybase.io (thus using the --no-import option).
keybase pgp select --no-import 4F156AD7
#    Algo    Key Id             Created   UserId
=    ====    ======             =======   ======
1    4096R   5D08BCDD4F156AD7             Sebastien Varrette <Sebastien.Varrette@uni.lu>, Sebastien Varrette <Sebastien.Varrette@gmail.com>
Choose a key: 1
▶ INFO Bundle unlocked: 5D08BCDD4F156AD7
▶ INFO Generated new PGP key:
▶ INFO   user: Sebastien Varrette (Falkor) <Sebastien.Varrette@gmail.com>
▶ INFO   4096-bit RSA key, ID 5D08BCDD4F156AD7, created 2017-03-01
▶ INFO Key 5D08BCDD4F156AD7 imported
Adding Trust Using Public Account
# prove that the twitter account @svarrette really belongs to you
$> keybase prove twitter svarrette

# repeat for github, your web site etc...
$> keybase prove github Falkor
$> keybase prove web https://varrette.gforge.uni.lu
GPG CLI Usage
$> gpg --gen-key                                        # Generate your PGP key
$> gpg --list-keys [pattern]                            # List available PGP key(s)
$> gpg --keyserver pgp.mit.edu --search-keys <pattern> # Search \& Import
$> gpg --keyserver pgp.mit.edu --recv-keys <ID>        # Import
$> gpg --keyserver pgp.mit.edu --send-keys <ID>        # Export to server
/!\ IMPORTANT: sending encrypted mails to user@domain.org assumes that you trust his key, i.e. that you sign (after careful check) this key (using GPG Keychain / GPA).
$> gpg [-K] --fingerprint <mail>                  # Get (with -K) / Check fingerprint
$> gpg --sign-key --ask-cert-level <ID>          # Sign Key <ID> AFTER check
$> gpg --keyserver pgp.mit.edu --send-keys <ID>  # Send back signed key
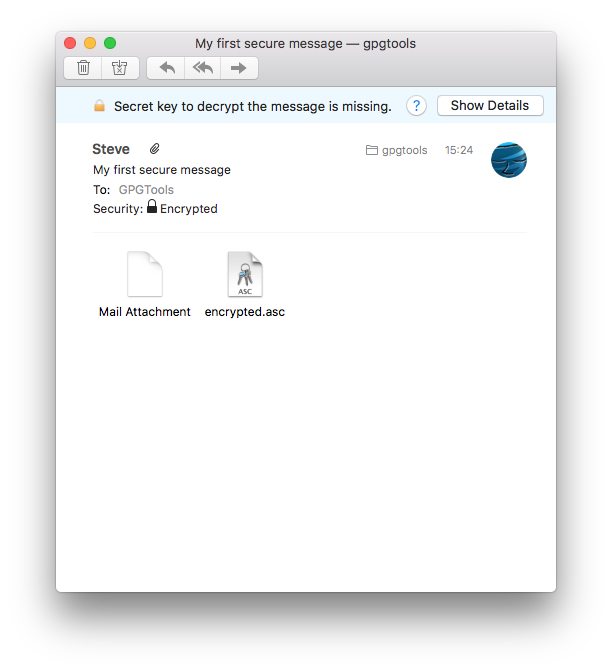
Now if you want to encrypt / decrypt / digitally sign files:
$> gpg --encrypt [-r <recipient>] <file>     # => <file>.gpg
$> rm -f <file>    # /!\ WARNING: encryption does not delete the input (clear-text) file

$> gpg --decrypt <file>.gpg           # Decrypt PGP encrypted file
$> gpg --armor --detach-sign <file>  # Generate signature file <file>.asc
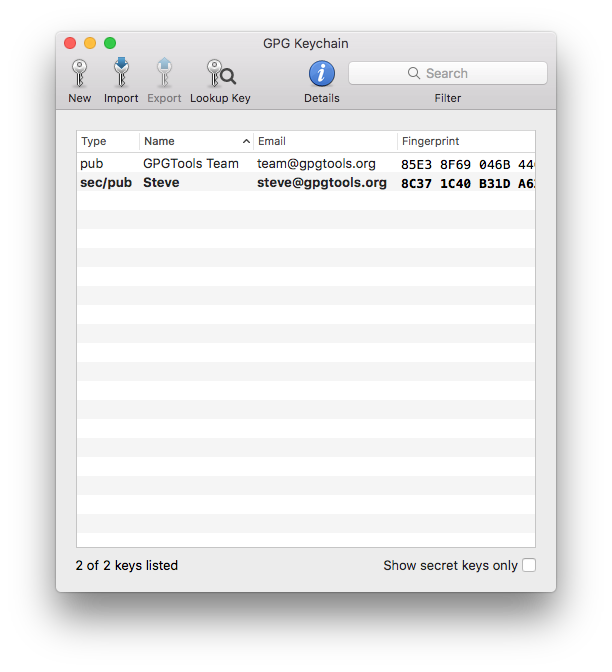
GPG Keychain / Keyring
- Linux / Mac OS:
~/.gnupg/ - Windows:
C:\\Documents and Settings\<LOGIN>\Application Data\gnupg\
Using GPG within git
- Sign tags using your GPG key with the
-soption- add Signed-off-by line by the committer using
-s:git commit -s [...] - GPG sign commit with
-S:git commit -s -S [...] - tag sign:
git tag -s <name>
- add Signed-off-by line by the committer using
- Assumes that you have configured git with your GPG signing key ID. Example below:
[user]
    name = Sebastien Varrette
    email = Sebastien.Varrette@uni.lu
    signingkey = 0x5D08BCDD4F156AD7
Advanced Tips and GPG-related tools
- Git-crypt
- Password management using the
passutility